
Migrating files to Microsoft 365 can feel like a high-stakes task, especially when business documents, team folders, and years of records are involved. The Microsoft SharePoint Migration Tool, commonly known as SPMT, provides a practical way to move content from local file shares or on-premises SharePoint environments into SharePoint Online.
This article explains how to use the SharePoint Migration Tool in a structured way, from preparation and installation through migration, validation, and planning for scenarios where native tooling may not meet every requirement.
- What Is the SharePoint Migration Tool?
- Step 1: Prepare Your Source and Destination
- Step 2: Download and Install SPMT
- Step 3: Sign In and Create a Migration Job
- Step 4: Scan Before You Migrate
- Step 5: Start the SharePoint Migration
- Step 6: Validate, Fix, and Finalize
- SharePoint Migration Tool Limitations to Know
- When to Consider an Alternative to SPMT
- Final Thoughts
What Is the SharePoint Migration Tool?
The SharePoint Migration Tool is Microsoft’s free utility for moving content from on-premises SharePoint Server document libraries and local file shares to SharePoint in Microsoft 365.
It helps process content through key migration stages such as scanning, packaging, uploading, and importing. This makes it a useful starting point for organizations moving shared folders, departmental content, or legacy SharePoint documents into SharePoint Online.
The tool is designed primarily for standard on-premises-to-cloud migration scenarios. It works best when the source, target, permissions, and content structure are reviewed before the migration begins.
Component | Does SPMT support? |
Standard files, folders, and list items | ✅ Supported |
Supported built-in SharePoint web parts | ✅ Supported, subject to Microsoft’s supported web-parts list. Some web parts may also require custom-script settings to be enabled. |
Custom web parts | ⚠️ Not guaranteed. Support depends on the web part, its configuration, and dependencies. Assess and validate these through a pilot migration. |
Custom pages | ❌ Not supported, except for supported wiki pages and web part pages. |
Custom SharePoint features | ❌ Not supported. |
Custom SharePoint solutions | ❌ Not supported. |
Custom workflows | ❌ Not supported. Some out-of-the-box SharePoint Server 2010 workflows may be migrated to Power Automate where supported. |
Master pages | ❌ Not supported. |
Custom New, Edit, and View forms | ❌ Not supported. |
InfoPath forms | ⚠️ Form files may migrate, but forms can require remediation and validation in Microsoft 365. |
Long file and folder paths | ⚠️ Supported up to 400 characters. Paths that exceed the limit must be shortened before migration. learn.microsoft+1 |
Step 1: Prepare Your Source and Destination
Before installing SPMT, identify what needs to move and where it will live in SharePoint Online. Create the destination site first, including libraries, site owners, and access model. Do not use migration to decide content structure.
For organization-level migrations, sign-in as a Global or SharePoint Admin account. For site-level moves, sign-in with Site Administrator account.
Before You Start, Check These Essentials
- Confirm whether the source is a local file share or an on-premises SharePoint Server environment.
- Review the destination SharePoint Online site, document library, and folder structure.
- Verify that the migration account has the required access to source and destination locations.
- Remove duplicate, outdated, or unnecessary content before migration.
- Review long folder paths, invalid file names, and unsupported characters.
- Assign content owners who can validate migrated data.
- Tell users when the migration will happen and when content should no longer be edited.
The SharePoint Migration Tool scans the selected source files before the migration. This scan helps identify access issues, unsupported content, and destination write problems before they become migration failures.
Step 2: Download and Install SPMT
Download the SharePoint Migration Tool from Microsoft Learn and install it on a Windows workstation or virtual machine.
For larger migrations, use a dedicated migration machine rather than a personal workstation. The computer should remain switched on and connected throughout the migration process.
Installation Checklist
- Download the latest general-availability version of SPMT from Microsoft.
- Review the Microsoft pre-requisites before installation.
- Install the tool on a Windows device with access to the source content.
- Ensure the migration machine has reliable internet connectivity.
- Check that the device has enough local storage for logs and temporary migration processing.
- Sign-in with an account that has the necessary SharePoint permissions.
SPMT supports several authentication methods, including multi-factor authentication, Kerberos, NTLM, SAML-based claims, and client certificate authentication.
For large workloads, multiple SPMT instances can run on separate devices or virtual machines. This can help teams process migration waves more efficiently when the source content is divided into manageable batches.
📌 Official Microsoft reference: Install the SharePoint Migration Tool
Step 3: Sign In and Create a Migration Job
The account used for the migration should have Site Collection Administrator access to the target SharePoint site. This allows the tool to write content into the selected document library.
How to Configure Your First Job
- Open the SharePoint Migration Tool.
- Sign in to the destination Microsoft 365 tenant.
- Select the source type, such as a file share or SharePoint Server document library.
- Enter the destination SharePoint Online site URL.
- Select the target document library or folder.
- Review the migration settings before proceeding.
- Save the job and run a scan before starting the migration.
SPMT Home Page
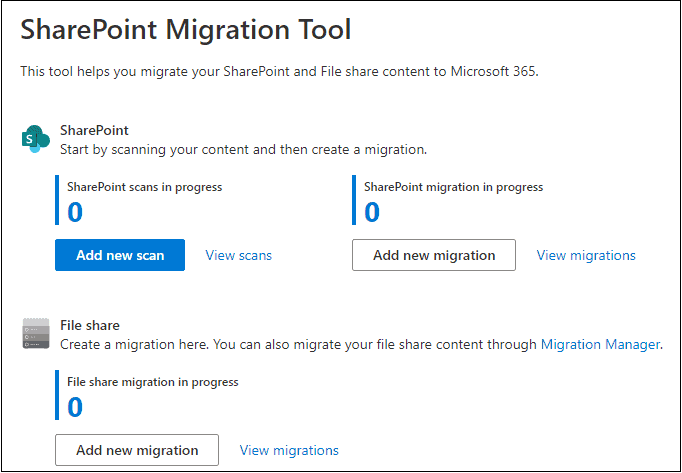
For larger projects, bulk migration jobs can be created using CSV or JSON files. This is useful when many file shares, document libraries, or site pages need to be migrated through a repeatable process.
Step 4: Scan Before You Migrate
The migration scan is a critical step in the SharePoint Migration Tool. It gives visibility into potential problems before the final migration begins.
When a migration job runs, SPMT scans the source files, packages the content, uploads the package to Azure, and imports it into the selected SharePoint Online destination.
The scan helps identify files or folders that may need attention before migration.
What to Review in the Scan Results
- Files and folders that cannot be accessed.
- Invalid characters in file and folder names.
- Long folder paths that may exceed SharePoint limits.
- Unsupported file types or unsupported SharePoint features.
- Permission-related warnings.
- Files that may be skipped during migration.
- Content that needs manual recreation after the migration.
Fixing these issues before the migration window reduces the chance of delays, missing files, or unexpected post-migration support requests.
📌 Official Microsoft reference: How the SharePoint Migration Tool works
💡 Make Your Pilot a “Migration Confidence Test”
A pilot migration provides evidence that the migration plan works before the larger rollout begins.
- Select a small but representative department or document library.
- Include different file types, folders, permissions, and metadata in the pilot.
- Ask business owners to validate important files after migration.
- Compare item counts between the source and the SharePoint Online destination.
- Record issues and use them to improve later migration waves.
- Use pilot results to set a more accurate timeline for the full migration.
A successful pilot gives stakeholders confidence and provides the migration team with practical insight into content quality, permissions, and user expectations.
Step 5: Start the SharePoint Migration
After the scan is reviewed and migration issues are addressed, select Migrate to begin the job.
The SharePoint Migration Tool processes content through scanning, packaging, uploading, and importing stages. These stages can run in parallel, helping the tool move content efficiently when the environment and migration machine are properly prepared.
For larger volumes of data, it is usually better to split work into logical waves. This makes progress easier to track and gives content owners time to validate each group of migrated files.
Best Practices for a Smooth Migration
- Schedule large migration waves outside busy working hours where possible.
- Start with low-risk or non-critical content.
- Use clear job names for each department, site, or migration wave.
- Assign a migration owner for every workload.
- Save migration reports after each completed job.
- Review failed and skipped items before starting the next wave.
- Avoid major source-content changes during the final migration window.
- Validate each wave before announcing completion.
SPMT creates reports and logs that can help identify content that was migrated successfully, skipped, or failed. These records are useful for troubleshooting and post-migration verification.
📣 Run a “First Week After Migration” Support Sprint
The migration experience does not end when the files arrive in SharePoint Online. Users need clear direction during the first few days after the move.
- Share the new SharePoint site URLs with affected users.
- Publish a short guide that explains where teams can find migrated content.
- Provide a simple way to report missing files or access issues.
- Identify support contacts for each migrated department.
- Monitor recurring issues and update guidance for upcoming migration waves.
- Share early success stories to encourage adoption of the new environment.
This approach helps reduce confusion and builds trust in the migration process.
Step 6: Validate, Fix, and Finalize
A completed SPMT job should always be followed by structured validation. The migration team should confirm that content is present, accessible, and usable in the destination SharePoint Online site.
Validation is especially important for business-critical document libraries, regulated records, finance folders, and content with complex permissions.
Post-Migration Validation Checklist
- Compare source and destination item counts.
- Open a sample of important documents in SharePoint Online.
- Verify the expected folder hierarchy.
- Check file names, versions, and metadata where required.
- Verify access for users, groups, and site owners.
- Review reports for skipped, failed, or partially migrated items.
- Resolve critical exceptions before closing the migration wave.
- Communicate completion and new SharePoint locations to users.
SharePoint Migration Tool Limitations to Know
The SharePoint Migration Tool is effective for many on-premises migration scenarios, but it is not built for every type of Microsoft 365 move.
SPMT cannot migrate content directly from one SharePoint Online tenant to another SharePoint Online tenant. This limitation is important for organizations involved in mergers, acquisitions, divestitures, tenant consolidations, or multi-tenant restructuring.
Microsoft’s native cross-tenant SharePoint migration capability is a separate process from SPMT. It is designed as a one-time migration and does not support incremental, or delta migration passes. It also has a 400-character path limit calculated using the source path and target user or site URL.
📌 Refer Overview of the SharePoint Migration Assessment Tool | Microsoft Learn for detailed split of the supported features in SPMT.
When to Consider an Alternative to SPMT
SPMT is a strong option for moving local file shares or on-premises SharePoint content into Microsoft 365. However, some migration projects need more flexibility, visibility, and control.
A different approach may be needed when the project involves tenant-to-tenant migration, mergers and acquisitions, phased coexistence, complex permission mapping, selective content migration, or the need to support staged migration waves.
These scenarios often require more than a basic copy process. They need detailed planning, content mapping, validation controls, user communication, and the ability to manage change without disrupting day-to-day work.
🚀 Looking for a Smarter SharePoint Migration Approach?
Apps4.Pro supports enterprise SharePoint migration requirements that go beyond the standard SPMT use case.
Explore the Apps4.Pro SharePoint Migration Tool to evaluate an approach that supports complex migration planning and execution.
Final Thoughts
Understanding how to use the SharePoint Migration Tool means more than installing an application and selecting a folder. A successful migration depends on preparation, a realistic pilot, thorough scanning, structured migration waves, and post-migration validation.
SPMT is a practical native tool for moving local file shares and on-premises SharePoint Server content to Microsoft 365. For cross-tenant or enterprise migration scenarios, recognizing its limitations early helps create a stronger migration strategy, protect business data, and deliver a smoother experience for users.

















 Migrate
 Manage
 Migrate Microsoft 365