
Every workday, your people sign in from a dozen places at once: a laptop at the office, a phone on travel Wi-Fi, a personal tablet at home, a contractor’s machine you’ve never seen before. A username and password simply can’t tell the difference between any of them. That’s the gap Conditional Access was built to close.
This guide explains what a Conditional Access system is, how it evaluates each sign-in, and the foundational policies most organizations implement first—written to be accessible whether or not you have a background in identity management.
What Is Conditional Access?
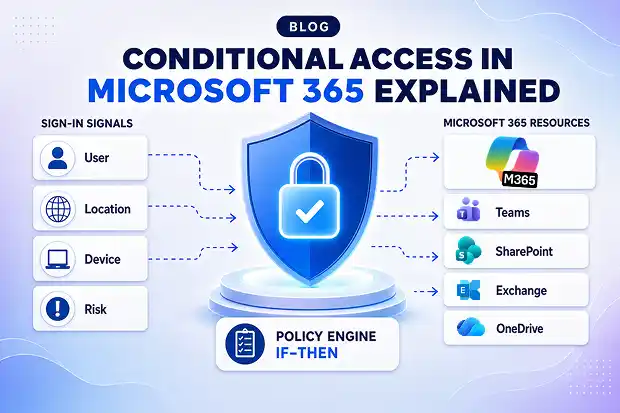
Conditional Access is the policy engine inside Microsoft 365 that decides whether a sign-in should be allowed, blocked, or challenged, based on the context of that specific sign-in. Microsoft describes it as the engine that brings signals together, makes decisions, and enforces organizational policies.
Think of it as a smart bouncer standing at the door of your data. A password gets you to the door. Conditional Access is what looks you over before deciding whether you actually get in, and whether you need to prove yourself a little harder first.
The simplest way to understand it is as an if-then statement: if a user wants to reach a Microsoft 365 app, then they must satisfy a requirement, for example, complete multifactor authentication.
One important detail that trips people up: Conditional Access runs after the first-factor sign-in (the password) is completed. It isn’t a firewall and it won’t stop a denial-of-service flood, but it can use the signals from those events to decide what happens next. Its job is to evaluate who is signing in, from where, on what, and how risky it looks, and then act accordingly.
Conditional Access lives in the Microsoft Entra admin center, under Entra ID > Conditional Access. If you’re a Microsoft 365 administrator, it’s the same identity system you already manage every day, just the part most focused on securing the sign-in itself.
How Conditional Access Works
Behind the friendly if-then idea is a three-part decision process. Every time someone signs in, Conditional Access gathers signals, weighs them against your policies, and enforces a decision.
Step 1 – It collects signals
Signals are the context of the sign-in. Microsoft’s engine can factor in:
- Who – the specific user, group, or directory role (e.g. all global admins)
- Where – the IP location or country the request is coming from
- What device – the platform (Windows, macOS, iOS, Android) and whether it’s compliant or managed
- Which app – the resource being accessed, such as Exchange Online, SharePoint, or Teams
- How risky it looks – real-time and calculated risk from Microsoft Entra ID Protection, flagging unusual or suspicious sign-in behavior
- Session signals – live monitoring from Microsoft Defender for Cloud Apps
Step 2 – It makes a decision
Based on those signals, the engine reaches one of two verdicts:
- Block access – the most restrictive outcome. The door stays shut.
- Grant access – allowed, but often with strings attached.
Step 3 – It enforces the requirements
When access is granted with strings attached, those strings are access controls. Microsoft lets you require any of the following before letting the user through:
- Require multifactor authentication (MFA)
- Require a specific authentication strength (e.g. phishing-resistant methods)
- Require the device to be marked compliant
- Require a Microsoft Entra hybrid joined device
- Require an approved client app or an app protection policy
- Require a password change
- Require the user to accept terms of use
Put it together and you get policies that read like sentences a human can understand: “If anyone with an admin role signs in, then require MFA.” That readability is exactly why Conditional Access has become the backbone of identity security in Microsoft 365.
Why It Matters Now: MFA Is No Longer Optional
For years, turning on Conditional Access was a best practice. More recently, Microsoft has made parts of it effectively mandatory.
Starting October 15, 2024, Microsoft began enforcing mandatory MFA for sign-ins to the Azure portal, the Microsoft Entra admin center, and the Microsoft Intune admin center, with the Microsoft 365 admin center following in February 2025. A second phase, effective October 1, 2025, extends the requirement to create, update, and delete operations through Azure CLI, Azure PowerShell, the Azure mobile app, Infrastructure-as-Code tools, and REST APIs.
The takeaway for administrators: everyone touching admin surfaces now needs MFA, including emergency break-glass accounts. One nuance worth getting right: automation that runs as a workload identity (a managed identity or service principal) is not affected by either phase of this enforcement. It’s user-based accounts pressed into service as service accounts that fall in scope, and Microsoft’s guidance is to migrate those to workload identities. The cleanest, most controllable way to meet this requirement, and go beyond it, is a well-designed Conditional Access policy.
The Starter Policy Recipes Most Organizations Turn On First
You don’t need fifty policies. You need a handful of high-impact ones, dialed in correctly. The three below work as a deliberate sequence, not a random checklist: the first closes the back door, the second locks the front door, and the third decides which keys are even allowed in the building. Each is among the policies Microsoft most commonly recommends.
One rule before you build any of them: always exclude your emergency access (break-glass) accounts from policies that block or restrict sign-in. A policy requiring MFA or a compliant device could otherwise lock you out during the exact crisis those accounts exist for. Create a dedicated group (for example, EmergencyAccess), exclude it from every restrictive policy, and test each quarter that it can still sign in.
Microsoft also recommends excluding service accounts and service principals from user-scoped policies, since these non-interactive identities can’t complete an MFA prompt and would otherwise break automated workflows. Where possible, replace them with managed identities and govern them separately with Conditional Access for workload identities. With those safety nets in place, build the recipes in order.
Recipe 1 – Block Legacy Authentication (close the back door first)
Start here, because nothing else you build matters if this door stays open. Legacy protocols (older mail and Office clients that can’t perform modern authentication) are physically incapable of completing an MFA prompt. That’s exactly why attackers reach for them: it’s a route around the very defenses you’re about to set up in Recipes 2 and 3.
How the policy reads:
- Who: All users (exclude break-glass accounts)
- What: All cloud apps
- Condition: Client apps -> legacy authentication clients
- Decision: Block access
This is one of the rare cases where pairing Block with all apps is appropriate. Run it in report-only mode first to confirm nothing critical still depends on legacy auth, then switch it on. Once this is enforced, every remaining sign-in is forced through modern authentication, which is precisely what the next recipe relies on.
Recipe 2 – Require MFA for Everyone (now lock the front door)
With legacy auth blocked, every login now flows through a path that can enforce MFA, so this is the moment to require it. Passwords get phished, reused, and leaked, making MFA the single most effective control against account takeover.
How the policy reads:
- Who: All users, and at minimum, all administrative roles (exclude break-glass accounts)
- What: All cloud apps
- Decision: Grant access, but require multifactor authentication
Requiring MFA for privileged roles and for Azure management tasks are both on Microsoft’s list of commonly applied policies. For your highest-value accounts, tighten MFA into a specific authentication strength that demands phishing-resistant methods like passkeys (FIDO2). At this point a stolen password alone is useless, but a verified user on an untrusted device is still a gap, which is what Recipe 3 closes.
Recipe 3 – Require a Compliant Device (decide which keys are allowed)
MFA proves who is signing in; this recipe proves what they’re signing in from. A correct password and a passed MFA prompt from an unmanaged, possibly compromised personal laptop is still a risk. This policy ensures the device meets your security bar (patched, encrypted, enrolled) before it ever touches company data.
How the policy reads:
- Who: All users (exclude break-glass accounts)
- What: Sensitive apps such as SharePoint Online, Exchange Online, and Teams
- Decision: Grant access, but require the device to be marked as compliant (managed through Microsoft Intune)
Together, the three recipes complete the journey from “anyone with the password gets in” to “only verified people, on trusted devices, using modern authentication, get in”, the core Zero Trust outcome. Layer them in this order and each one reinforces the last instead of standing alone.
Test Before You Enforce: Report-Only Mode
Here’s the mistake that scares administrators away from Conditional Access: a policy that’s too broad can lock real users, or yourself, out. There’s a built-in safety net for exactly this.
Report-only mode lets a policy evaluate every sign-in and log what would have happened, without actually enforcing anything. You get to see the real-world impact (who’d be blocked, who’d be prompted for MFA, what breaks) before flipping the switch to on.
A safe rollout pattern looks like this:
- Build the policy and set it to report-only.
- Watch the sign-in logs for a week or two to spot unexpected impact.
- Pilot it on a small group of real users.
- Expand to everyone once you’re confident.
Microsoft also offers a What If tool to simulate how policies would apply to a hypothetical sign-in, and a Conditional Access Optimization Agent that suggests improvements based on Zero Trust best practices. Use them. They turn “hope this works” into “I’ve already seen this work.”
A Few Good Habits That Keep Policies Manageable
Good Conditional Access isn’t just about which policies you build; it’s about keeping them manageable over time. These four habits do exactly that.
- Use a naming convention. A consistent prefix system, signaling the audience or purpose of each policy at a glance, makes it instantly clear what every policy does and speeds up troubleshooting. This is an operational best practice rather than a built-in requirement, but it pays off quickly as your policy list grows.
- Design for personas, not individuals. Map your organization into a few broad groups (admins, standard staff, guests) and write policies tied to those personas rather than dozens of granular one-offs. This mirrors the persona-based approach Microsoft uses in its own Conditional Access framework and keeps your policy count low as headcount grows.
- Avoid a blanket block all apps policy. As noted in Recipe 1, pairing Block with all apps is appropriate only in narrow cases like legacy authentication. Used more broadly, it can lock administrators out of the Entra portal itself, which is also why your break-glass exclusions matter.
- Make sure every app is covered. Classify your applications by sensitivity and confirm each one falls under at least one policy, so nothing slips through unprotected. Because assignments combine with AND logic, a forgotten app simply has no guard at all.
Put these habits alongside the report-only rollout method, and you have a Conditional Access setup that stays both secure and maintainable as your organization changes.
What You’ll Need: Licensing in Brief
Conditional Access isn’t part of every Microsoft 365 plan by default. The essentials:
- Microsoft Entra ID P1 is the baseline license for Conditional Access. Organizations with Microsoft 365 Business Premium can use it too.
- Risk-based policies (acting on sign-in risk or user risk) require Microsoft Entra ID Protection, a P2 feature.
- Don’t have either? Security defaults give all customers a baseline set of protections, including MFA enforcement, a reasonable starting point until you license Conditional Access.
One reassuring note: if your licenses lapse, existing policies aren’t automatically deleted. You can still view and remove them, you just can’t edit them until you re-license.
The Bottom Line
Conditional Access is the part of Microsoft 365 that turns “the password was correct” into “this sign-in is actually safe to allow.” It gathers context about every sign-in, checks it against your if-then rules, and either lets the user in, challenges them, or shuts the door.
You don’t have to boil the ocean. Start with three policies (block legacy authentication, require MFA, require compliant devices), test them in report-only mode, exclude your break-glass accounts, and you’ll have closed the most common doors attackers walk through. From there, Conditional Access grows with you: persona by persona, app by app, signal by signal, toward a genuine Zero Trust posture.
The door to your data was always going to have a bouncer. Conditional Access just makes sure it’s a smart one.
Reference Links
- Microsoft Entra Conditional Access overview – https://learn.microsoft.com/en-us/entra/identity/conditional-access/overview
- Plan for mandatory Microsoft Entra MFA – https://learn.microsoft.com/en-us/entra/identity/authentication/concept-mandatory-multifactor-authentication
- Manage emergency access accounts in Microsoft Entra ID – https://learn.microsoft.com/en-us/entra/identity/role-based-access-control/security-emergency-access

















 Migrate
 Manage
 Migrate Microsoft 365