
Your customer emails a familiar address, but your reply arrives from a different one. That small mismatch can make an otherwise straightforward conversation feel less clear.
With Sending from Aliases now generally available in Exchange Online, you can send messages from aliases configured on your mailbox instead of relying only on your primary email address. This gives you more flexibility without switching inboxes.
Whether you manage client enquiries, project communication, or different business identities, the update helps you use the right sender address for each conversation.
- What Is Exchange Online Send from Alias?
- Why Microsoft 365 Email Aliases Deserve a Fresh Look
- How to Enable Sending from Aliases in Exchange Online
- How to Send from an Alias in Outlook
- Shared Mailboxes and Hybrid Exchange: Know the Boundaries
- Message Trace and Mail Flow Rules Need an Alias Check
- Keep Control of Which Domains Can Send
- What Microsoft Is Exploring Beyond Alias Sending
- Give Every Customer Conversation the Right Sender Address
What Is Exchange Online Send from Alias?
An email alias is an additional email address connected to your existing mailbox. Messages sent to that address arrive in the same inbox as messages sent to your primary address.
Exchange Online send from alias lets you use those configured addresses for outgoing email as well. In supported Outlook clients, you can:
- Send messages using a mailbox alias.
- Reply from the alias that received the original email.
- Choose which aliases appear as available sending addresses.
For example, you could use a client-facing alias for external communication while continuing to manage your email in one mailbox.
💬 Which Email Identity Would You Use?
Think about where a more relevant sender address could improve your communication.
- Client communication
- Brand-specific conversations
- Project enquiries
Identify the address that would make your role or purpose clearest to the recipient.
Why Microsoft 365 Email Aliases Deserve a Fresh Look
If you only need an additional sending address, creating another mailbox can add unnecessary administration. Native alias sending offers a simpler option for using another email identity.
However, an alias and a shared mailbox serve different needs. An alias adds an address to your existing mailbox, while a shared mailbox lets multiple people manage a common inbox.
Choose the option that fits how the email will be handled:
- Use an alias when you need another address for your existing mailbox.
- Use a shared mailbox when several people need to read and respond to messages sent to a common address.
For example, a personal client-facing address may work well as an alias. A support inbox managed by several colleagues is better suited to a shared mailbox.
How to Enable Sending from Aliases in Exchange Online
If you administer Exchange Online, you can enable Sending from Aliases through PowerShell or the Exchange admin center. The setting applies at the organization level.
You also need to ensure that the required aliases are configured on the relevant user mailboxes.
Option 1: Enable Alias Sending with PowerShell
In an Exchange Online PowerShell session, run:
Set-OrganizationConfig -SendFromAliasEnabled $True
This enables Sending from Aliases for your organization. Your administrator account must have the appropriate permissions to run the command.
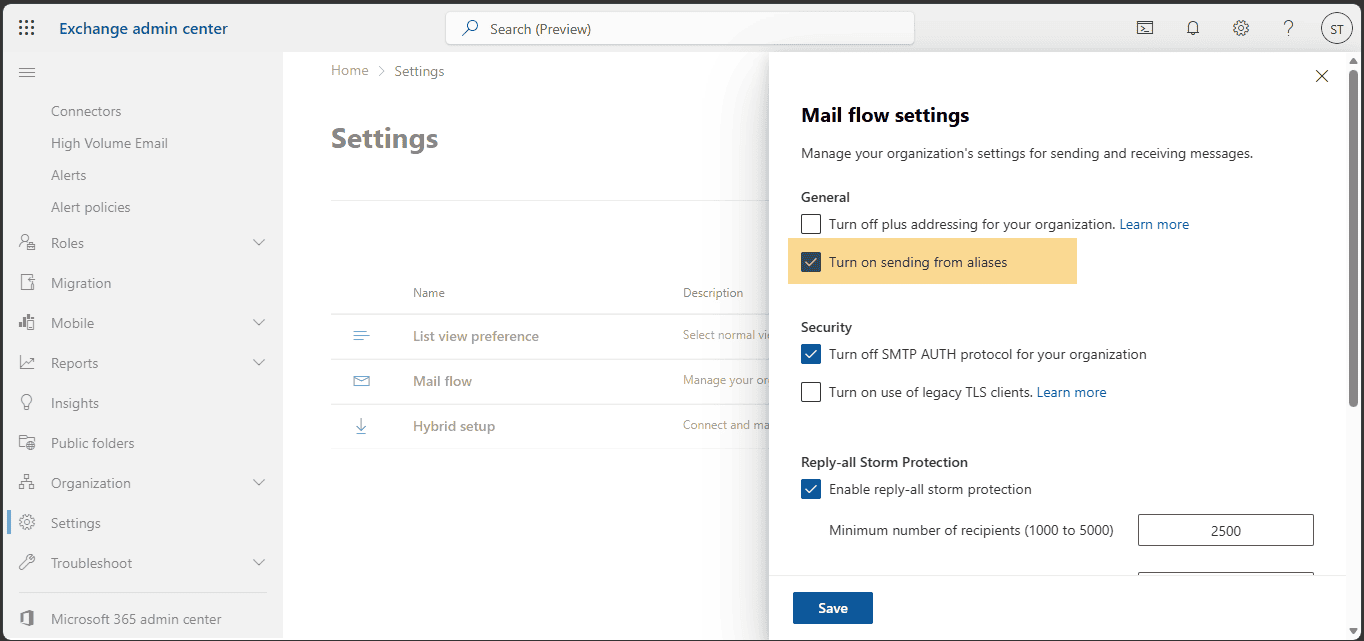
Option 2: Use the Exchange Admin Center
To enable the feature through the graphical interface:
- Open the Exchange admin center.
- Go to Settings > Mail Flow.
- Turn on Sending from Aliases.

Add the Email Addresses Users Need
To add an alias through the Microsoft 365 admin center:
- Go to Users > Active users.
- Select the user.
- Open Manage username and email.
- Enter the alias, select the domain, and choose Add.
- Save the changes.
Review the address before saving so it matches the identity you want recipients to see.
🎯 Put Your Customer-Facing Address to the Test
Start with one alias that serves a clear business purpose.
- Send a test message to an external recipient.
- Check the sender address they see.
- Reply to the message and review the conversation.
This simple check helps you confirm the experience before using the alias for customer communication.
How to Send from an Alias in Outlook
Once alias sending is enabled and your addresses are configured, you can choose the appropriate sender address in a supported Outlook client.
The selection process depends on the Outlook version you use:
- Outlook on the web: Go to Settings > Compose to view and select aliases.
- Outlook for Windows or Mac: Use the From dropdown or enter the alias manually.
- Outlook mobile: Tap the From field to select an available alias.
Replies automatically use the alias that received the original message. During your initial tests, check the From field to confirm that Outlook selects the address you expect.
Shared Mailboxes and Hybrid Exchange: Know the Boundaries
Before using alias sending across your organization, check how it applies to your mailbox types and mail flow.
Shared mailboxes and hybrid Exchange environments have limitations that can affect the sending experience.
Shared Mailbox Alias Sending Has Client Restrictions
Sending from a shared mailbox alias is supported in Outlook on the web when a delegate opens the mailbox through Open another mailbox.
This capability is not supported in Outlook desktop clients. If you manage a shared mailbox, confirm that your workflow uses the supported access method.
Hybrid Mail Flow Can Preserve Unexpected Addresses
Sending from Aliases applies to Exchange Online-hosted mailboxes. If messages pass through on-premises Exchange servers, alias addresses may be rewritten.
In a hybrid environment, a routing address such as user@mail.contoso.onmicrosoft.com may also be preserved. This can cause an automatic reply to use that address instead of your customer-facing domain.
Test the complete message route so you can confirm what recipients actually see.
Message Trace and Mail Flow Rules Need an Alias Check
Your sender address also matters to the systems that track and process email. After enabling alias sending, review any configuration that depends on a specific email address.
Focus on these areas:
- Message trace: Search using the alias address. Searching only for the primary SMTP address does not include messages sent from an alias.
- Mail flow and journaling rules: Check whether address-based conditions match messages sent using aliases.
- Email hygiene rules: Review controls that rely on particular sender addresses.
- Sender presentation: Confirm that the From address and display name appear as intended.
Do not treat a successful test email as the only validation step. Your organization’s journaling, routing, and compliance requirements still need to work correctly with the additional sending addresses.
🔎 Could Your Rules Miss an Alias?
Check the controls behind your first test message.
- Can you find it in message trace using the alias?
- Do the relevant mail flow rules apply?
- Does the recipient see the expected sender?
Resolve any mismatch before making alias sending part of your regular workflow.
Keep Control of Which Domains Can Send
You may have domains that should receive email without being available for sending. Administrators can configure a domain as receive-only to support that requirement.
The SendingFromDomainDisabled and SendingToDomainDisabled parameters of Set-AcceptedDomain provide domain-level controls for the relevant sending and receiving restrictions.
For more specific requirements, review your mail flow rules and internal policies. Align those controls with the aliases your users are expected to use.
What Microsoft Is Exploring Beyond Alias Sending
Additional alias capabilities are being investigated, but they are not committed features.
Areas under consideration include:
- Separate display names for individual aliases.
- Additional filtering and default controls.
- Calendar support.
Plan your current setup around the capabilities already available, rather than depending on these potential enhancements.
Give Every Customer Conversation the Right Sender Address
Exchange Online send from alias helps you use a more relevant email identity while keeping your messages in an existing mailbox.
For a reliable setup, configure the right aliases, confirm the supported Outlook experience, and test your address-based rules. These checks help keep both customer communication and internal email processing consistent.
Explore Microsoft’s Official Alias Sending Guidance
Use these Microsoft resources to plan, configure, and manage alias sending with confidence: