
One careless email can expose your contracts, client data, or financial records to the wrong eyes. The good news is that Outlook already has built-in encryption that locks down your messages before they ever leave your outbox.
If you handle customer records or manage sensitive internal communications, knowing how to send a secure email in Outlook is a skill worth mastering. This guide walks you through every method, one step at a time.
Why Email Encryption Matters
Email is one of the most common ways sensitive pieces of information slip out of an organization. Encryption scrambles your message so only the person you intend can actually read it.
Microsoft Purview Message Encryption lets you send protected messages to people both inside and outside your company. It works even when your recipient is on Gmail, Yahoo, or another provider.
Here is what you gain when you encrypt:
- Your confidential data stays protected in transit and at rest
- Recipients on any email platform can still receive your message
- Forwarding, copying, and printing of sensitive content can be restricted
- Your compliance and governance posture gets stronger
User-Level Encryption With Outlook Settings
Method 1: Encrypt or Do Not Forward
This is the fastest way to secure a message and the option you will reach for most often.
Here is how you do it:
- Compose a new email in Outlook
- Select the Options ribbon at the top
- Click the Encrypt icon

- Choose Encrypt or Do Not Forward depending on the restriction you want
- Finish writing your email and click Send
The difference is simple. “Encrypt” secures your message, while “Do Not Forward” also stops the recipient from forwarding it to anyone else.
If you need to remove the protection, just select No permission set before you send.
🎯 Try It Live Challenge
Send a test encrypted email to your own personal Gmail or Yahoo address. Watching the one-time passcode flow happen for yourself turns this from a how-to into something you will actually remember.
Method 2: Send S/MIME Encrypted Emails
S/MIME uses certificates for stronger, identity-based encryption and digital signatures, which makes it ideal if you work in a regulated industry.
Before you start, set up Outlook to use encryption and digital signatures with a valid certificate. Then do the following:
- In your message, select Options then More Options.
- Under Message options, enable Encrypt this message (S/MIME).
- To add a signature, check Digitally sign this message (S/MIME).
- Select OK, finish composing, and click Send.
If Outlook cannot confirm that every recipient can decrypt your message, it shows you a warning so you can adjust your recipients before sending.
Method 3: Encrypt Every Email Automatically
If you work in a high-security role, you can encrypt all your outgoing mail by default instead of choosing each time.
In new Outlook, go to Settings then Mail then S/MIME and choose:
- Encrypt contents and attachment for all messages I send
- Add a digital signature to all messages I send
- Automatically choose the best certificate for digital signing
This takes human error out of the equation, which is a real win for governance when you handle sensitive data every day.
Organization-Wide Encryption With Mail Flow Rules
Encryption becomes even more powerful when governance is automated across your entire organization. As an administrator, you can enable Microsoft Purview Message Encryption by creating mail flow rules, also known as transport rules.
When a user sends a message that matches the conditions you set, that message is encrypted automatically. You define these rules in the Exchange admin center under Mail Flow ➜ Rules.
That means your sensitive emails, such as anything containing financial or personal data, get protected without anyone needing to remember to do it.
How Recipients See Your Encrypted Email
When you send an encrypted email, the recipient does not just see a locked, unreadable message. Outlook handles the experience smoothly, whether they are inside your organization or using an external provider like Gmail or Yahoo.
Here is what happens on their end:
- They receive a notification that you have sent them a protected message.
- They click a link to open it in a secure web viewer or directly in their email app.
- If needed, they sign in with their email account or request a one-time passcode.
- The passcode is sent to their inbox, and they enter it within 15 minutes to unlock the message.
Once verified, they can read the message just like any normal email. They can also reply, and an encrypted copy of their response comes back to you securely.
If you chose Do Not Forward, the recipient will find that forwarding, copying, and printing are blocked. The protection travels with the message, so your sensitive content stays controlled even after it leaves your outbox.
Removing Encryption From Sent Emails
Removing protection after a message has been sent is possible, but only in specific situations. Emails encrypted with Microsoft Purview Advanced Message Encryption can be revoked by both administrators and senders, depending on how the message was protected and how the recipient opens it.
How an Admin Can Revoke Encryption
Administrators have the broadest control over encrypted mail across the organization. They can revoke access to sent messages using the built-in Microsoft Purview management tools.
The admin-side options typically include:
- Using the Microsoft Purview or Microsoft 365 admin tools to locate and revoke a specific encrypted message.
- Running PowerShell revocation cmdlets to pull back access to an email sent with Advanced Message Encryption.
- Adjusting or removing the mail flow rule that applied encryption, so future matching messages are no longer protected.
Admin revocation works only for mail that recipients open through the encrypted web portal, and it cannot undo content that has already been viewed or copied.
Note
The “encrypted web portal” is the secure Microsoft-hosted webpage where recipients open protected emails when they cannot decrypt them inside their own Inbox.
How a Sender Can Revoke Encryption
A sender can also revoke certain emails directly, without needing an administrator to step in. This works for mail sent to a single recipient using a social account such as Gmail or Yahoo, meaning the recipient who received the link-based experience.
The steps are simple:
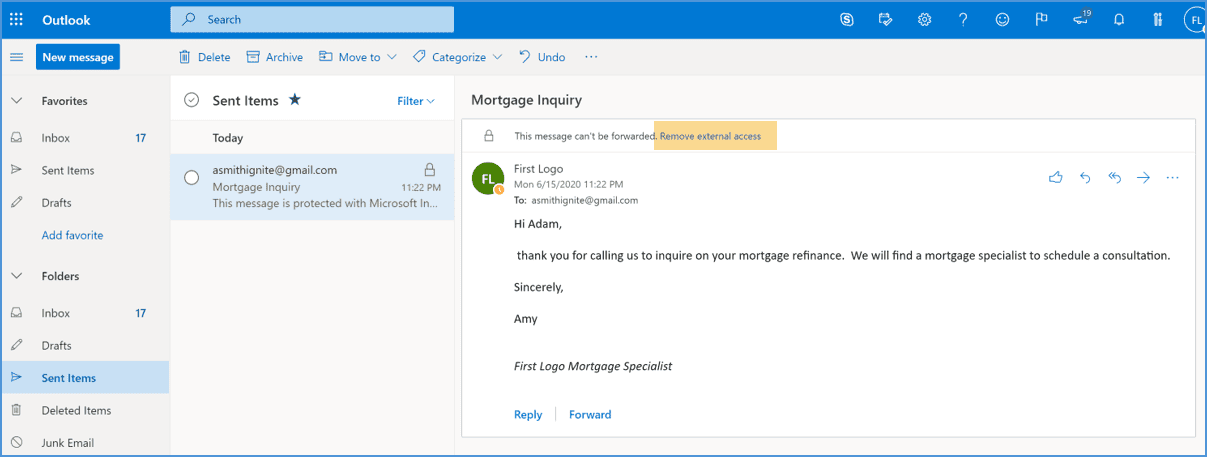
- In Outlook on the web, open your Sent folder and find the message you want to revoke.
- If the message is revocable, a Remove external access link appears at the top.
- Click Remove external access, and the message status changes to revoked.

One key limit applies. You cannot revoke a message sent to a work or school Microsoft 365 account or a Microsoft account like Outlook.com.
When in doubt, it is best to leave protection in place. An unencrypted version can always be resent if needed, but sensitive data can never truly be recalled once someone has read it.
Final Thoughts
Sending a secure email in Outlook does not have to be complicated. With handful of Encrypt options just a click away, you can protect a sensitive message in the time it takes to write one.
The key is matching the method to the moment. Quick encryption handles everyday confidential mail, S/MIME suits regulated communication, and mail flow rules protect your whole organization automatically.
Treat encryption as a habit, not an afterthought. Start with a single test message today and make secure sending your default tomorrow.
Official Microsoft References
For deeper, authoritative guidance, explore these official resources: