
External email is still one of the easiest ways for phishing attempts, spoofing, and suspicious messages to reach a busy Inbox.
That is why, this latest Microsoft update gives Outlook users a much easier way to spot external messages and automatically handle them before those emails create distraction, confusion, or risk.
In simple terms, external emails can now be sorted, flagged, categorized, or moved automatically, helping keep the Inbox cleaner and safer.
What this Outlook update delivers
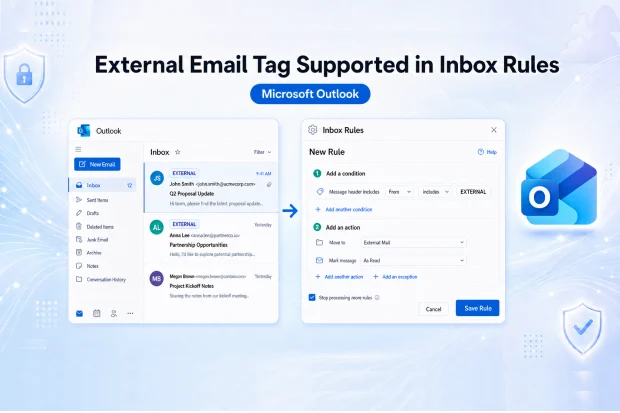
Microsoft is introducing support for the External tag in Inbox Rules across modern Outlook experiences. This is especially useful in organizations where ExternalInOutlook is already enabled, and external sender identification is part of the email security strategy.
Key highlights:
- The External tag applied by ExternalInOutlook can now be used as a rule condition in Outlook Inbox Rules.
- External emails can be automatically moved, categorized, or flagged based on user preference.
- Rule management is supported across platforms such as:
- New Outlook for Windows
- Outlook on the web
- Outlook for Mac
- Exchange Online for the admin side of configuration
- The feature is available by default in tenants where ExternalInOutlook is already enabled.
Ask Yourself: How much unwanted external mail lands in your Inbox?
A quick look at the average workday Inbox – vendor messages, newsletters, unknown senders, promotional emails, and urgent sounding requests. Being able to separate those emails automatically can save time and reduce mistakes.
- Which ones should never sit beside important internal conversations?
- Which external emails deserve immediate attention?
- Which ones should be reviewed later?
Why this matters for security and compliance
External sender identification helps make it clear when an email comes from outside the organization.
When that visibility is combined with Inbox Rules, the result is not just awareness, but action. External emails can be handled automatically before they blend into user’s day-to-day activity.
Benefits include:
- Better phishing awareness because external messages are easier to spot.
- Less Inbox clutter by routing external newsletters, promotions, or vendor emails into separate folders.
- Better separation between internal discussions and outside communication.
- Reduced dependence on older mail flow rules that add banners or subject line text.
For security and IT admins, this is a practical improvement that supports both end user awareness and cleaner mailbox management.
How to enable and configure ExternalInOutlook
To use the External tag in Inbox Rules, ExternalInOutlook must be enabled in Exchange Online. This is configured via the Get-ExternalInOutlook and Set-ExternalInOutlook PowerShell cmdlets.
Prerequisites
- Appropriate Exchange Online admin permissions are required.
- The ExchangeOnlineManagement PowerShell module should be installed.
Step 1: Connect to Exchange Online
- Open PowerShell with the required admin account.
- Run: Connect-ExchangeOnline -UserPrincipalName admin@yourtenant
Step 2: Check the current setting
- Run: Get-ExternalInOutlook
- Review whether the feature is enabled and check any allow list settings already in place.
Step 3: Enable ExternalInOutlook
- Run: Set-ExternalInOutlook -Enabled $true
- Microsoft and community guidance indicate that it may take up to 24 to 48 hours before the External tag appears consistently in supported Outlook clients.
Step 4: Configure allow lists if needed
Some organizations may want trusted domains or addresses to avoid being tagged as external.
Examples:
- Add trusted domains or addresses: Set-ExternalInOutlook -AllowList @{Add=”contoso.com”,”admin@example.com”}
- Remove an address from the allow list: Set-ExternalInOutlook -AllowList @{Remove=”admin@example.com”}
This gives admins more control over how external sender labeling behaves in real world business scenarios.
How to build Outlook rules using the External tag
After ExternalInOutlook is enabled and post this update is rolled out, rules can be created around the External tag.
Common use cases:
- Move External tagged email into a separate folder for review.
- Categorize or flag vendor emails from outside the organization.
- Highlight messages that may need extra attention because they come from an external sender.
Typical rule setup flow:
- Open Inbox Rules in Outlook settings.
- Create a new rule.
- Choose the condition based on messages marked with the External tag.
- Select the action, such as move, categorize, flag, or mark for visibility.
Try these practical rule ideas
A few thoughtful changes can make external email easier to review without making the Inbox harder to use.
- Create an “Review Later” folder for messages from unknown outside senders.
- Send external newsletters and promotions into a separate reading folder “Promotion”.
- Flag external vendor communication so follow ups are easier to spot.
- Keep sensitive internal conversations visually separate from messages that come from outside the business.
Recommended admin actions
According to the rollout note, no direct user action is required for the new rule support itself.
Recommended actions for admins:
- Confirm that ExternalInOutlook is enabled in the tenant.
- Review older transport rules that add external warnings to avoid duplicate labelling.
- Update internal support documentation and user guidance.
- Share a short awareness note on what the External tag means and how rules can help.
Helpful Microsoft references for further reading
Here are some useful resources for deeper reading and implementation:
- Microsoft Learn: Set-ExternalInOutlook PowerShell cmdlet
- Microsoft Q and A: External email tagging in Exchange Online
- Microsoft Q and A: External tag not appearing after configuration
- Microsoft 365 Roadmap Link: Emails marked with External to be supported as Rule conditions