
Introduction
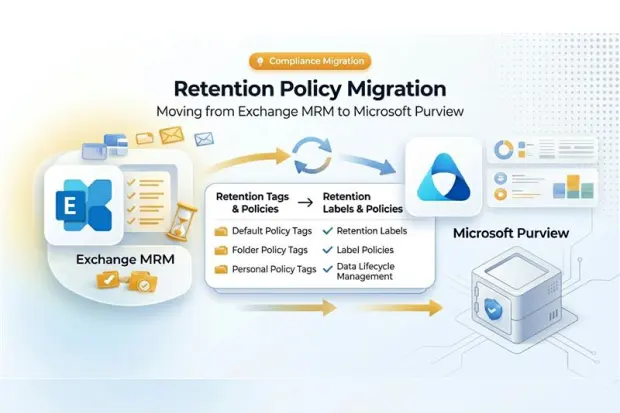
Microsoft has made it clear: the future of retention in Microsoft 365 is Microsoft Purview Data Lifecycle Management (DLM), not the legacy Messaging Records Management (MRM) system built into Exchange. MRM, originally introduced in Exchange 2007 and refined in Exchange 2010, still works but it’s now surfaced under the “Exchange (legacy)” label inside the Purview portal, a not-so-subtle hint that its days as the primary retention tool are numbered.
For enterprise compliance teams, this creates an urgent migration imperative. Regulatory frameworks like GDPR, HIPAA, and SEC Rule 17a-4 demand defensible retention and running two parallel systems introduces risk, complexity, and audit gaps.
This guide walks you through how retention works across your Microsoft 365 workloads, how to configure it, a critical OneDrive change you must plan for, and a practical, phased migration from MRM to Purview. The first sections lay the foundation, then we move into the migration itself.
- How Retention Works Across SharePoint, OneDrive, and Exchange
- Configuring a Purview Retention Policy Step by Step
- The OneDrive Retention Change You Cannot Ignore
- Why Migrate? The Compliance Case Against Legacy MRM
- MRM vs Purview: Key Architectural Differences
- Phase 1: Assess Your Current MRM Configuration
- Phase 2: Design Equivalent Purview Policies and Labels
- Folder Tags → Purview Auto-Apply Labels (Where Possible)
- Phase 3: Execute the Migration
- Phase 4: Manual Validation via the Purview Compliance Portal
- Common Pitfalls and How to Avoid Them
- The End State
How Retention Works Across SharePoint, OneDrive, and Exchange
Before planning a migration, it helps to understand how retention actually behaves across your workloads. A single Purview retention policy can span multiple workloads at once, which is what makes it so different from Exchange-only MRM. The same policy can target Exchange mailboxes, SharePoint sites, OneDrive accounts, and Microsoft 365 Groups in one configuration.
Retention works on a simple principle: keep content, delete content, or keep it and then delete it after a set period. When content falls under a “retain” policy, deleted or edited versions are not lost.
Where they live differs by workload:
- SharePoint and OneDrive: When a user edits or deletes a retained document, a copy is kept in the hidden Preservation Hold library on the site until the retention period ends.
- Exchange: Retained items that a user deletes are moved into the hidden Recoverable Items folder in the mailbox.
- All workloads: Users continue working normally and are usually unaware retention is running in the background.
Policies vs Labels
Two mechanisms handle enforcement, and it helps to know the difference:
- Retention policies apply broadly at the mailbox, site, or account level with no user action needed.
- Retention labels apply at the individual item or folder level and can be applied by users or auto-applied by conditions.
Most users meet retention data governance not in the admin portal but inside Outlook. When you publish retention labels to Exchange, they surface in the Assign Policy menu, so retention policies in Outlook feel to the end user like a label they simply pick from a list in Outlook or OWA – while the underlying data retention keeps running automatically in the background, whether or not anyone applies a label.
For a deeper dive, Microsoft’s official documentation walks through exactly how retention behaves for these two workloads. See Learn about retention for SharePoint and OneDrive for the full breakdown.
Configuring a Purview Retention Policy Step by Step
With that foundation in place, here is how you actually build a policy. You configure retention policies in the Microsoft Purview portal, not in individual admin centers, so one workflow covers all workloads. Global Administrator, Compliance Administrator, or a scoped records management role is required.
Follow this sequence:
- Sign in to the Microsoft Purview portal and go to Solutions → Data Lifecycle Management → Policies → Retention
- Select New retention policy and give it a clear name and description.
- Set the policy scope using admin units, or leave it as the full directory for organization-wide coverage.
- Choose the policy type: static (you pick exact locations) or adaptive (locations are matched dynamically by attributes).
- Toggle on the locations you need, including Exchange mailboxes, SharePoint sites, OneDrive accounts, and Microsoft 365 Groups.
- Define retention settings: how long to keep items, whether the clock starts at creation or last modification, and the action at the end (retain, delete, or retain then delete).
- Review the summary and select Submit to activate.
A practical note on timing: newly created policies can take up to 7 days to fully propagate, so avoid validating too early. For the full walkthrough, follow Microsoft’s Create and configure retention policies guide.
The OneDrive Retention Change You Cannot Ignore
One workload deserves special attention before you go further. Microsoft changed the default behavior for unlicensed OneDrive accounts, and it has direct billing and compliance consequences. This is essential context for any records or offboarding strategy.
Here is what changed:
- Starting January 27, 2025, unlicensed OneDrive accounts left unlicensed for more than 93 days are either moved to the recycle bin and permanently deleted, or archived if a retention policy applies.
- Deleted-user OneDrive data still follows the default 30-day preservation plus 93-day admin-recoverable window, but is archived after 93 days if a retention policy beyond the default exists.
- An unlicensed account is placed in read-only mode on its 60th unlicensed day, then archived on the 93rd day if a retention policy or hold applies – or moved to the recycle bin and permanently deleted if none does.
- These changes do not apply to EDU, GCC, or DoD customers.
- Critical caveat: if archive billing is never enabled, the OneDrive data is deleted 365 days after the account becomes unlicensed – regardless of any retention policy, retention setting, eDiscovery, or legal hold. Paying for archive storage is what keeps those holds enforceable beyond that point.
The cost impact is the sting. Accessing archived accounts requires a one-time reactivation fee of $0.60/GB, plus a monthly storage fee of $0.05/GB charged across all archived accounts, not just the one you reactivate.
Practical options to stay ahead of this:
- Inform stakeholders and grant a manager access to a departing user’s OneDrive during offboarding.
- Have clients formally opt in to storage fees, or keep a defined limited retention policy for unlicensed accounts.
- Rely on third-party backup so data can be restored later without triggering archive billing.
- Assign (or re-assign) a Microsoft 365 license to reactivate one identity without switching on billing for everything. This free re-license path only works while the user object still exists in Entra ID – and it incurs no reactivation fee; once the identity is hard-deleted, paid reactivation is the only way back in.
Importantly, Microsoft has since clarified that OneDrives retained solely for eDiscovery or legal hold under Purview do not incur these storage or reactivation fees, which distinguishes compliance holds from business-continuity access. You can identify affected accounts in the SharePoint admin center under Reports → User reports → Unlicensed users. Microsoft’s guidance is at learn.microsoft.com under “Manage unlicensed OneDrive user accounts.”
Why Migrate? The Compliance Case Against Legacy MRM
OneDrive is only half the governance picture; on the Exchange side, the bigger shift is moving off legacy MRM entirely.MRM served organizations well for over a decade, but it has critical limitations in today’s multi-workload Microsoft 365 environment:
- Exchange-only scope. MRM retention tags and policies apply exclusively to Exchange mailboxes. They cannot govern SharePoint, OneDrive, Teams, or Microsoft 365 Groups.
- User override risk. MRM personal tags such as “Never Delete” are applied at the item level by end users. These tags can override organization-wide Purview retention policies, creating compliance gaps where items survive beyond mandated deletion windows.
- No unified audit trail. MRM lacks the centralized compliance reporting that Purview provides through Content Search, eDiscovery, and the Compliance Manager dashboard.
- Archive-only advantage remaining. The one feature MRM still offers that Purview cannot replicate is moving items from a primary mailbox to an online archive mailbox. Folder-specific retention tags are the other notable MRM-only capability.
Microsoft now recommends Purview retention labels and policies for all compliance scenarios, reserving MRM only for archive-move operations.
MRM vs Purview: Key Architectural Differences
Before migrating, you need to understand the fundamental differences between the two systems:
| Dimension | Exchange MRM | Microsoft Purview DLM |
|---|---|---|
| Scope | Exchange mailboxes only | Exchange, SharePoint, OneDrive, Teams, Groups |
| Tag types | Default, folder, and personal tags | Retention labels (manual + auto-apply) and retention policies |
| Granularity | Folder-level and item-level | Mailbox/site-level (policies) or item-level (labels) |
| User interaction | Users apply personal tags in Outlook/OWA | Users apply published retention labels |
| Override behavior | Personal tags can override org policy | Regulatory record labels cannot be overridden |
| Archive moves | Supported via Move to Archive action | Not supported – keep MRM for this |
| Processing engine | Managed Folder Assistant (MFA) | Purview background service + MFA for coexistence |
| Management portal | Purview > Exchange (legacy) | Purview > Data Lifecycle Management |
Phase 1: Assess Your Current MRM Configuration
Start by documenting everything. Navigate to the Microsoft Purview portal → Solutions → Data Lifecycle Management → Exchange (legacy) to view your existing MRM retention policies and tags.
Inventory with PowerShell
Use the ExchangeOnlineManagement module to extract a complete picture:
# Connect to Exchange Online

Connect-ExchangeOnline -UserPrincipalName admin@contoso.com

# List all MRM retention policies

Get-RetentionPolicy | Format-Table Name, RetentionPolicyTagLinks

# List all retention tags with details

Get-RetentionPolicyTag | Format-Table Name, Type, AgeLimitForRetention, RetentionAction

# Identify which mailboxes use which policy

Get-Mailbox -ResultSize Unlimited | Format-Table DisplayName, RetentionPolicy
Document the following for each policy:
- Policy name and assigned mailbox count
- All linked retention tags (default, folder, and personal)
- Retention periods and actions (Delete and Allow Recovery, Permanently Delete, Move to Archive)
- Any personal tags users have manually applied to items
Identify Migration Blockers
Flag any MRM capabilities without a Purview equivalent:
- Move to Archive tags - Keep these in MRM; Purview cannot replicate this function.
- Folder-specific tags - Purview retention policies don’t target individual default folders (e.g., a 30-day deletion tag on the Junk Email folder). You’ll need workarounds or acceptance of broader policy scoping.
- Personal tags with “Never Delete” - These are the highest-risk items. A user applied “Never Delete” tag can prevent Purview from deleting content on schedule.
Phase 2: Design Equivalent Purview Policies and Labels
Map each MRM component to its Purview counterpart:
Default Policy Tags → Purview Retention Policies
MRM default policy tags (DPTs) that apply a blanket retention period across the entire mailbox translate directly to Purview retention policies scoped to Exchange. Create a retention policy in Purview with the same retention period and action (retain, delete, or retain-then-delete).
Personal Tags → Purview Retention Labels
Replace MRM personal tags with Purview retention labels that users can manually apply. A critical best practice: use the same display names for the new labels as the old personal tags. This ensures users see familiar options in Outlook and OWA, minimizing confusion during the transition.
Publish the labels using a label publishing policy scoped to the same mailboxes that had the MRM policy.
Folder Tags → Purview Auto-Apply Labels (Where Possible)
Folder-level retention tags are the hardest to replicate. Purview auto-apply label policies based on content conditions or keywords can approximate this behavior, but a true folder-level scope is not available. Evaluate whether the business requirement can be met through broader policy scoping or content-based auto-labeling.
Phase 3: Execute the Migration
Follow this sequence to avoid gaps in retention coverage:
Step 1: Deploy Purview Policies First
Create and activate your Purview retention policies and publish your retention labels before removing any MRM tags. Purview policies can take up to 7 days to become effective – up to 24 hours for distribution plus additional processing time.
Step 2: Verify Purview Policies Are Active
Confirm in the Purview Compliance Portal that policies show a status of On and are scoped to the correct locations. Check a sample mailbox using Compliance Search to validate that content is being retained or labeled as expected.
Step 3: Strip MRM Personal and Folder Tags
Edit each MRM retention policy to remove personal tags and folder tags, leaving only the default archive tag (if archive moves are still needed):
# Remove all tags except the archive tag from a policy

Set-RetentionPolicy "Corporate Policy" -RetentionPolicyTagLinks "Default 2 year move to archive"
The next time the Managed Folder Assistant processes the mailboxes, it will remove the legacy tags from the user-facing display.
Step 4: Force MFA Processing (Optional)
Rather than waiting up to 7 days, trigger immediate processing:
# Process a specific mailbox

Start-ManagedFolderAssistant -Identity user@contoso.com

# Process all mailboxes (use cautiously in large tenants)

Get-Mailbox -ResultSize Unlimited | Start-ManagedFolderAssistant
Critical Warning: Tags Migrate but Reset
This is the most commonly missed detail in MRM-to-Purview migrations. When you remove MRM retention tags from a policy, the tag metadata on individual items does not carry over to Purview labels. The retention clock effectively resets.
Here’s what happens in practice:
- An email that was 350 days into a 365-day MRM deletion period does not carry that age into a new Purview retention policy.
- Purview calculates retention based on its own start date (typically when the policy first applies to the content or based on the item’s creation/sent date, depending on configuration).
- Items with user-applied MRM personal tags retain those stamps even after the policy is removed – they remain visible in Outlook until MFA clears them.
Mitigation: Run a pre-migration report identifying items nearing their MRM retention expiry. Decide whether to let MRM process those items to completion before cutting over, or accept the retention period restart under Purview.
Phase 4: Manual Validation via the Purview Compliance Portal
Automated migration is not enough. Manual validation is essential for compliance defensibility.
Validation Checklist
- Policy status check. In Purview → Data Lifecycle Management → Retention Policies, confirm all policies show “On” status with correct scope.
- Label publication verification. Navigate to Labels → Published labels and confirm your replacement labels are published to the correct user groups.
- Content Search spot-check. Run a Compliance Search against sample mailboxes to verify that items are being retained according to the new policies. Look specifically for items that previously had MRM personal tags.
- MRM coexistence audit. In Exchange (legacy), verify that remaining MRM policies contain only archive-move tags. Any leftover deletion or personal tags indicate an incomplete migration.
- User experience test. Open OWA or Outlook as a test user and confirm that:
- Old personal tag names no longer appear in the “Assign Policy” menu
- New Purview retention labels are visible and selectable
- There is no duplication (both old tags and new labels showing simultaneously)
- Conflict resolution verification. If both MRM tags and Purview policies temporarily coexist, remember: Purview gives priority to its own labels for items in Deleted Items as of recent MFA updates. Confirm this behavior matches your expectations.
Ongoing Monitoring
After the migration, monitor for at least two full MFA processing cycles (approximately 14 days) to confirm:
- No items are being deleted prematurely or retained beyond their intended period
- Archive moves continue functioning if you retained MRM archive tags
- No user-reported issues with missing retention label options
Common Pitfalls and How to Avoid Them
- Pitfall: Removing MRM policies before Purview policies are active → Gap in retention coverage. Always deploy Purview first.
- Pitfall: Forgetting about MRM personal “Never Delete” tags → Items survive past compliance deadlines. Audit and remove these before or during migration.
- Pitfall: Assuming folder-level granularity exists in Purview → It doesn’t. Plan alternative approaches for folder-specific retention requirements.
- Pitfall: Not accounting for the 7-day propagation delay → Testing too early shows false negatives. Wait a full week before validating.
- Pitfall: Skipping the hybrid coexistence period → User confusion from duplicate tags/labels. Plan for a brief overlap and communicate the change to users.
The End State
A successful migration leaves you with:
- MRM retention policies containing only default archive tags (if archive mailboxes are in use)
- Purview retention labels replacing all MRM personal tags
- Purview retention policies handling all deletion and retention-period enforcement
- A clean, auditable configuration in the Purview Compliance Portal with no legacy tag conflicts
- Users seeing a single, consistent set of retention labels across Outlook, OWA, and other Microsoft 365 apps
The move from MRM to Purview is not optional for organizations serious about cross-workload compliance. It’s a matter of when, not if – and the sooner you migrate, the fewer legacy complications you’ll inherit.

















 Migrate
 Manage
 Migrate Microsoft 365