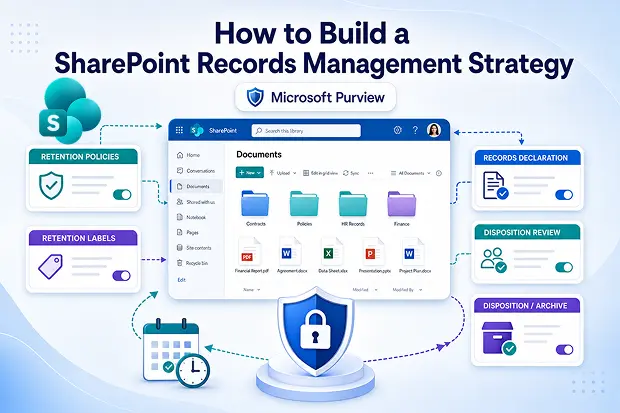
Most SharePoint tenants look organized until you look closer. Old contracts, unsecured HR files, finance reports, Teams recordings, and forgotten archives can pile up fast.
That mess is more than clutter. It is a tenant-level risk waiting for an auditor, lawsuit, or Copilot prompt to expose it. The answer is not more storage or tighter folders. It is a SharePoint records management strategy built on Microsoft Purview retention policies and labels.
This guide walks through exactly how to do that. It covers how retention policies SharePoint Online admins actually use in production, how Microsoft records management turns ordinary documents into legally defensible records, and the exact workflow to roll it out without breaking the way users work.
- Why SharePoint Records Management Matters More
- Retention Policies vs. Retention Labels: Know the Difference
- The Records Management Lifecycle in Microsoft 365
- How to Build a Retention Plan That Actually Works
- Where Content Goes When Retention Kicks In
- Common Mistakes That Break SharePoint Records Management
- Licensing: What You Actually Need
- Connecting the Dots With Your Broader Governance Strategy
- Your 30-Day Action Plan
Why SharePoint Records Management Matters More
Think about everything SharePoint Online quietly holds for you today.
It is not just a document library anymore. It is the backbone of your Teams files, your OneDrive shares, your Loop components, and now every piece of content Copilot reaches into when someone asks it a question.
That means every governance gap you have multiplies fast quietly in the background.
A single mismanaged SharePoint site can cause you real pain:
- Regulatory fines under GDPR, HIPAA, SOX, or whatever your industry throws at you
- Failed legal discovery when you cannot produce records or prove they are authentic
- Bloated storage costs from years of ROT (redundant, obsolete, trivial) content
- Copilot surfacing stale or sensitive information to people who should never see it
- Loss of institutional knowledge when someone deletes a critical record by accident
Records management is the one workstream that quietly addresses all these pains. And Microsoft Purview gives you the tooling to do it without rebuilding your tenant from scratch.
Retention Policies vs. Retention Labels: Know the Difference
This is where almost every admin gets stuck. So let us slow down and get it right.
Both retention policies and retention labels live inside Microsoft 365 records management. But they solve very different problems and mixing them up is what causes those late-night “why did this file disappear” tickets.
Retention Policies (broad, location-based)
Think of retention policies as your safety net. They run quietly in the background and apply rules across entire locations without your users ever noticing.
- You apply them to all SharePoint sites, specific sites, OneDrive accounts, or specific document libraries
- Every item in that location inherits the same retain or delete rule
- They are perfect for baseline guarantees like “keep all SharePoint content for at least 7 years”
- Your users see nothing. No UI changes. No training. No tickets.
Set up a baseline retention policy this quarter, it buys you some peace of mind.
Retention Labels (granular, item-level)
Retention labels are where the real records management work happens. They go deeper, classify individual items, and can actually declare a document as an immutable record.
- You apply them to specific files, folders, document sets, or content types
- They can be applied manually by users, automatically by rules, or by default at the library level
- They support event-based retention, so the clock can start when a contract ends, an employee leaves, or a project closes
- They can mark content as a record or a regulatory record, which locks it from edits and deletion
- They trigger disposition reviews before anything is permanently deleted
Recommended
- Use retention policies as the bare minimum every site must meet.
- Use retention labels as the precise rules for the records that really matter.
60-Second Governance Admin-Check
Open your Microsoft Purview portal in a new tab. Then answer three quick questions out loud.
- Do you have at least one retention policy applied to all SharePoint sites?
- Have you published any retention labels with “Mark items as a record” enabled?
- Can you name the person responsible for approving disposition reviews?
If you answered “no” to any of these, you are operating without a safety net right now. That is not a judgment. It is the reality for most tenants you and I would walk into today.
The Records Management Lifecycle in Microsoft 365
Every record on your tenant should travel through a predictable, auditable lifecycle. Microsoft Purview handles all five stages natively, so you do not have to bolt anything on.
Here is the journey, in order.
- Creation of the content into SharePoint, OneDrive, or Teams
- Classification using a retention label, applied manually, automatically, or as a default
- Declaration as a record to lock down edits, renames, and deletions
- Retainment for the required duration, based on age, modification date, or business event
- Disposal of it through a reviewed, logged, and exportable deletion process
The magic happens in stages 3 and 5. That is where SharePoint stops behaving like a glorified file share and starts behaving like a real records system you can defend in an audit.
How to Build a Retention Plan That Actually Works
Compliance fatigue is real, and over-labelling will kill your rollout faster than no labelling at all. Follow this proven sequence instead. It works whether your team is two people or two hundred.
Step 1: Build Your Retention Schedule
Start with a simple inventory. What record types does your business actually produce, and what does each one legally require?
For instance, set the period for each category.
- Contracts: 7 years after termination
- Employee files: 7 years after departure
- Financial records: 7 years
- Tax documents: 10 years
- Health and safety records: 30 years
- Project documentation: 5 years after project close
Do not aim for perfect on day one. Aim for “good enough to defend.” You can always add categories later.
Step 2: Create Retention Labels in Microsoft Purview
Once your schedule is on paper, log into the Purview portal and head to Solutions, Records Management, File Plan. Build one label for each record category.
- Set the retention period and the trigger (created date, modified date, labelled date, or event)
- Decide whether to mark it as a record or a regulatory record
- Configure the end-of-retention action (delete, trigger disposition review, or relabel)
Recommended
Keep label names plain and human. “Contracts 7Y After Termination” beats “RM-LEG-CT-007-TERM” every single time.
Step 3: Publish and Auto-Apply
Publishing is where you decide who carries the load. Make sure it is not your end users.
- Auto-apply by keyword, sensitive info type, or trainable classifier
- Set default labels at the document library level so new uploads inherit the right rules
- Use adaptive scopes to dynamically target sites based on metadata like department, region, or sensitivity
If you set this up well, your future self will thank you. New sites will get the right policy the moment they spin up.
Step 4: Enable Disposition Review
Please do not skip this one ever.
Never let a system silently delete a record on your behalf. Always route end-of-life decisions to a real records manager for sign-off and proof. When the auditor asks “how do you know this was deleted properly,” you want to point at a clean log, not shrug.
Where Content Goes When Retention Kicks In
You will troubleshoot this someday, so let us cover it now while it is fresh.
When a retention policy fires inside SharePoint Online, a few specific things happen behind the scenes.
- Original deletes or edits are blocked while retention is active
- A retained copy quietly lands in the hidden Preservation Hold library
- Your users see no change at all
- Your compliance officers see a complete audit trail
- When the retention period ends, content is either permanently deleted or moves to disposition review
This is why a deleted file can still appear in eDiscovery searches months later. The Preservation Hold library is doing exactly what it was designed to do.
Common Mistakes That Break SharePoint Records Management
Here are the six mistakes that could be put on a poster above every admin desk.
- Stacking overlapping retention policies and labels without understanding the principles of retention
- Forgetting that retention labels survive site deletion through the Preservation Hold library
- Skipping disposition review and losing your proof of defensible deletion
- Letting end users remove labels because record-level permissions were never locked down
- Ignoring adaptive scopes and manually updating policies every time a new site is created
- Skipping a pilot site and publishing retention policies tenant-wide before testing how labels, auto-apply rules, and disposition actions actually behave
Every one of these is preventable with a 30-minute design session before you click “Create”.
Licensing: What You Actually Need
Before you build, you should know what your license can actually do. The capabilities are tiered, so let us match them to your reality.
- Basic retention policies and labels are included in Microsoft 365 E3
- Auto-apply labels, trainable classifiers, full records management, and disposition review need Microsoft 365 E5 or the E5 Compliance add-on
- Regulatory records and the advanced file plan need E5 Compliance
If you are on E3 today, do not wait for an upgrade to start. Begin with manual labels and broad retention policies. Make the business case for E5 only when records declaration and automation become genuinely critical to your operations.
Note:
Licensing can vary by plan, region, and Microsoft updates, so always validate current capabilities in the Microsoft 365 admin center or Microsoft documentation before rollout.
Licensing can vary by plan, region, and Microsoft updates, so always validate current capabilities in the Microsoft 365 admin center or Microsoft documentation before rollout.
Connecting the Dots With Your Broader Governance Strategy
Records management is more powerful when it is not flying solo. It is one piece of your bigger Microsoft 365 compliance posture.
You can layer it like this.
- Pair retention labels with sensitivity labels so the same document is protected and retained at the same time
- Combine retention with DLP policies so records cannot leak out before they are even classified
- Layer Conditional Access on top so only the right people can apply or remove labels
- Use eDiscovery (Premium) to surface retained content the moment a legal hold is needed
Your 30-Day Action Plan
Here is the runway I would put on your calendar if we were working on this together.
- Week 1: Inventory your record types, draft a retention schedule, and line up your stakeholders
- Week 2: Create your first three retention labels in Purview and configure a pilot policy on one site
- Week 3: Test auto-apply rules, disposition reviews, and the Preservation Hold library on the pilot
- Week 4: Publish tenant-wide policies, document your file plan, and train your records managers
By day 30, you will have a defensible, automated SharePoint records management posture. It will survive audits, scale with growth, and stay out of your users’ way. That is the version of compliance worth building.
Before you publish another tenant-wide retention policy, start with one pilot site, three high-risk record types, and one approved disposition owner. That small start can prevent bigger compliance problems later.
Official Microsoft References to Bookmark
When you want to go deeper, go straight to the source.
- Learn about retention policies and retention labels
- Get started with records management in Microsoft 365
- Records management for documents and emails in Microsoft 365
- Create and configure retention labels
- Disposition of content in Microsoft Purview
- Adaptive scopes for retention policies
- Learn about retention for SharePoint and OneDrive