
Introduction
Microsoft Teams is the main app that powers today’s modern workplace. Chats, files, meetings, and collaboration with coworkers, partners, and customers all happen in one place. While this makes teamwork easier, it also creates security challenges for IT administrators. A single mistake – such as making a team public instead of private, allowing too much guest access, or letting anonymous users join meetings – can expose sensitive company data.
The good news is that you don’t have to lock down everything to keep Teams secure. By configuring the right Microsoft Teams privacy settings and applying custom security controls only where they are needed, each team can have the appropriate level of access and collaboration without increasing security risks.
This guide walks you through the controls that matter in 2026 – from a single team’s privacy toggle to tenant-wide policies, Microsoft Purview sensitivity labels, shared-channel governance, and Teams Premium meeting protection.
- Public vs. Private Teams: Your First Privacy Decision
- Change Team Privacy Settings in Teams (Step-by-Step)
- Custom Security Settings in the Teams Admin Center
- Sensitivity Labels: Custom Security for 100+ Teams Without Manual Work
- Privacy in Shared Channels and Private Channels
- Teams Premium: When the Standard Policy Isn’t Enough
- Three Methods to Configure Custom Security in Teams (Compared)
- Microsoft Teams Privacy & Security: Quarterly Review Checklist
- Keep going
Public vs. Private Teams: Your First Privacy Decision
Every team in Microsoft Teams gets a privacy status – Public, Private, or Org-wide. It’s the single most important team privacy setting, because it decides who can even see the team exists.
Privacy type | Who can find it | Who can join | Best for |
|---|---|---|---|
Private | Only members and owners | By owner invite or approved request | HR, finance, M&A, anything confidential |
Public | Anyone in your tenant | Anyone in your org, no approval needed | Communities of practice, open knowledge sharing |
Org-wide | Everyone in the tenant (auto-added) | All licensed users | Company announcements (only for tenants with 10,000 or fewer users; up to five org-wide teams per tenant) |
When in doubt, go Private. It’s far easier to open a team up later than to walk back a data leak.
Change Team Privacy Settings in Teams (Step-by-Step)
Privacy status controls who can see that a team exists. Setting it correctly is the first step to preventing accidental data leaks.
Team owners can change privacy themselves, as long as your admin policy hasn’t locked it down.
Step 1: In Microsoft Teams, click Teams in the left rail and find the team you own.
Step 2: Click More options (the three dots ⋯) next to the team name, then select Manage team.
Step 3: Open the Settings tab and expand Team details.
Step 4: Click Edit, then pick Private or Public from the Privacy dropdown.
Step 5: Click Done to save.
Once a team is private, it vanishes from the Teams catalog. New members have to be invited by an owner or come in through a join request.
Admin tip:
If owners can’t see the Privacy dropdown at all, your tenant has the Set-Team policy locked. You can still change it yourself with PowerShell:
  Connect-MicrosoftTeams
  Set-Team -GroupId <TeamId> -Visibility Private
Connect-MicrosoftTeams Set-Team -GroupId <TeamId> -Visibility PrivateCustom Security Settings in the Teams Admin Center
These tenant-wide toggles set the security baseline for every team at once, so a single misconfiguration here can affect your whole organization.
For tenant-wide guardrails, the Microsoft Teams admin center is home base. Review these four areas at least once a quarter, meaning: spot-check the toggle values, audit any policy exceptions, and confirm no new defaults were silently introduced by a Microsoft service update.
For a complete walkthrough of configuring Guest Access and External Access in the Microsoft Teams admin center, including every setting and permission.
Control Meeting Privacy and Lobby Settings
Open lobby and anonymous-join settings let uninvited users or bots slip into sensitive meetings, so locking them down protects confidential conversations.
Meeting privacy issues are one of the most common security risks. If the “Everyone can bypass the lobby” setting is enabled, anonymous users or even bots can join your boardroom meeting directly without waiting in the lobby.
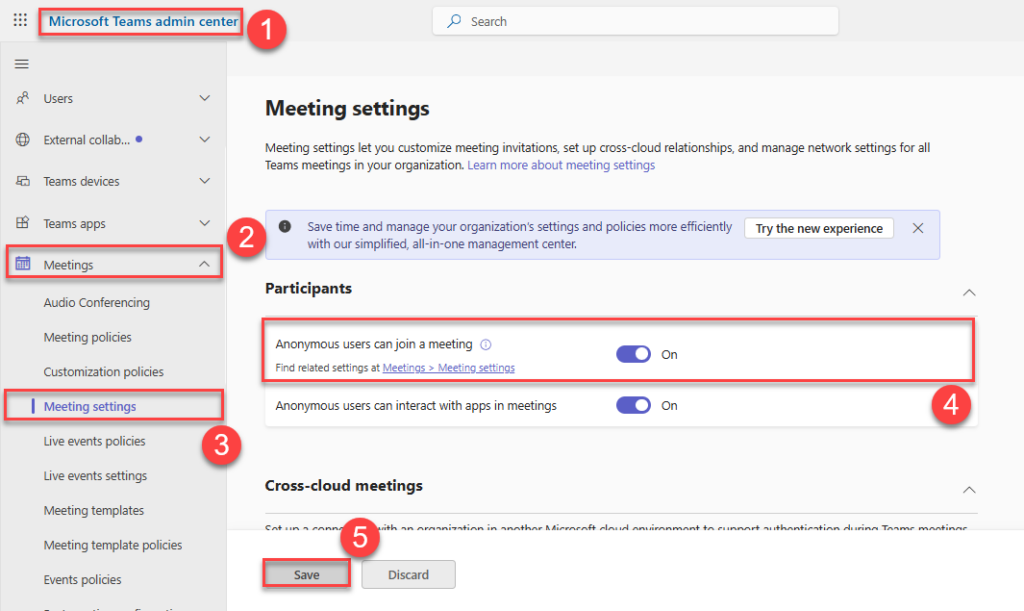
Tenant-wide setting:
Step 1: In the Teams admin center, go to Meetings > Meeting settings.
Step 2: set Anonymous users can join a meeting to On or Off.
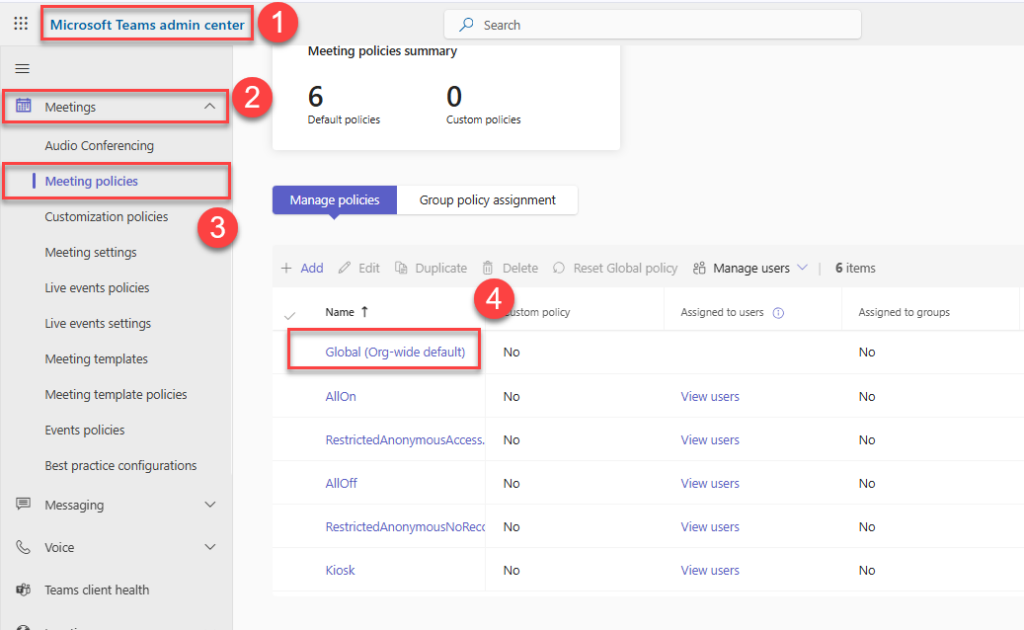
Per-organizer policy:
Step 1: Go to Meetings > Meeting policies and open the policy you want to edit. Start with Global (Org-wide default).
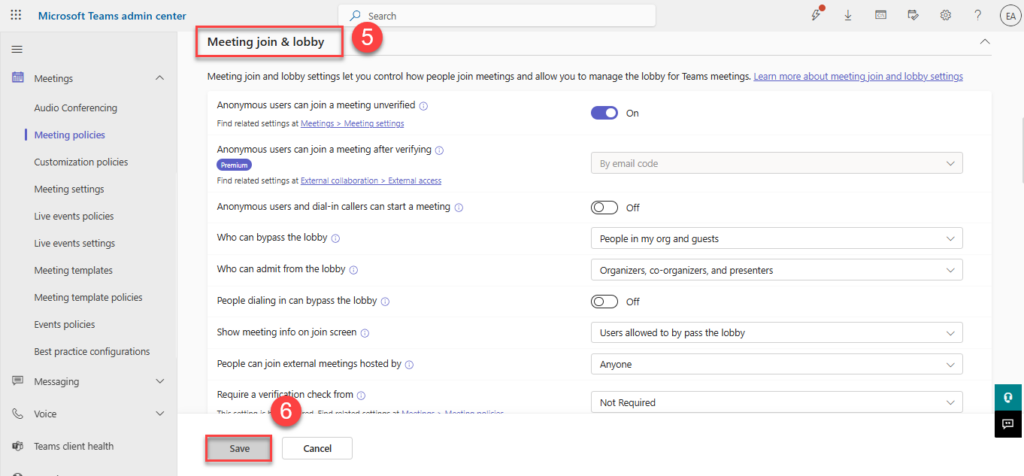
Step 2: In the Meeting join & lobby section, review:
- Anonymous users can join a meeting – controls whether external or unauthenticated users can join at all.
- Anonymous users and dial-in callers can start a meeting – leave Off unless you have a strong reason. Otherwise unverified accounts can launch meetings at odd hours.
- Who can bypass the lobby – set to People in my org for the safest default. Use People in my org and guests only for trusted federations.
- People dialing in can bypass the lobby – usually best left Off.
- Who can admit from lobby – restrict to Organizers and co-organizers for sensitive meetings.
Step 3: Save. Changes can take up to 24 hours to take effect.
Pro tip: ( Microsoft is retiring the standalone CAPTCHA verification check (locked from May 2026, fully removed by August 2026) in favor of a new bot-detection capability that flags external meeting bots at join and prompts organizer approval. Enable bot detection and keep lobby bypass set to People in my org.
Manage SharePoint Sharing for Team Sites
Every team is backed by a SharePoint site, and that site has its own sharing controls. If your Teams privacy is buttoned up but SharePoint sharing is wide open, you’ve still got a leak waiting to happen.
Step 1: Open the SharePoint admin center.
Step 2: Go to Sites > Active sites and pick the site backing your team.
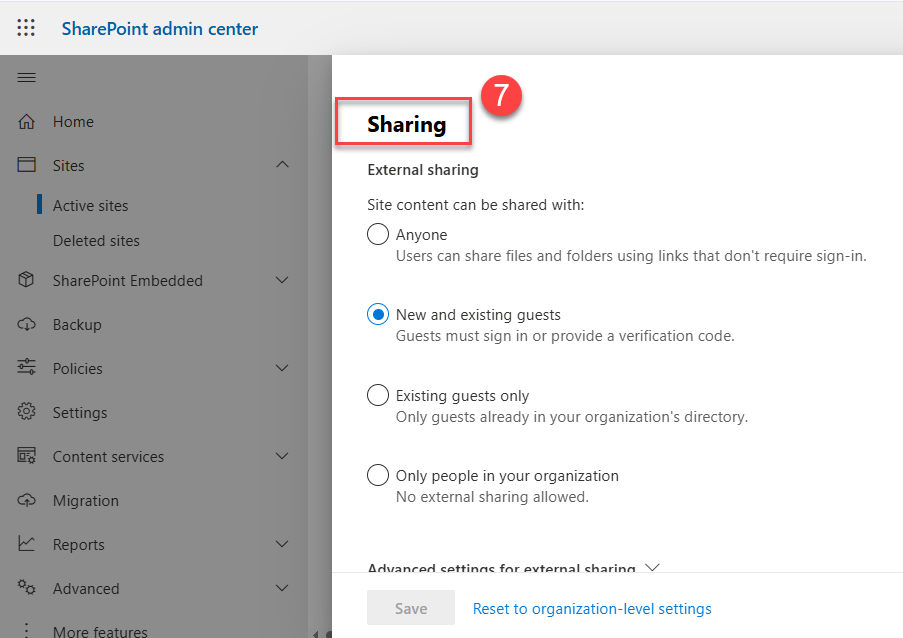
Step 3: Click Sharing in the top toolbar.
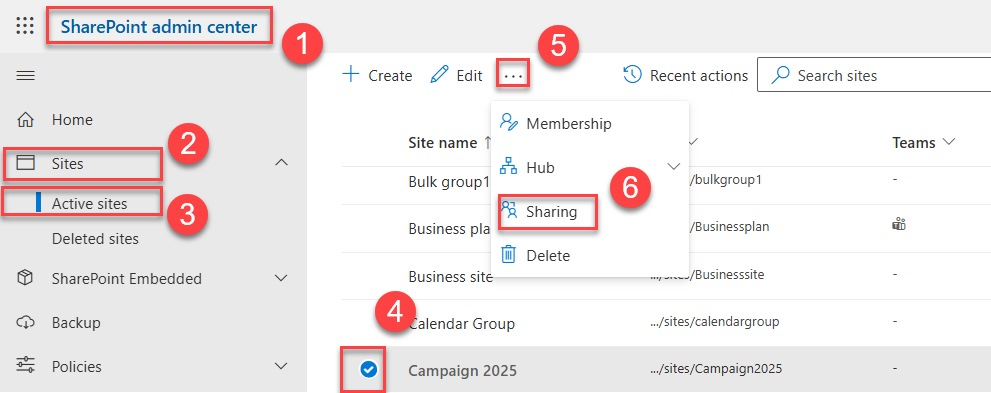
Step 4: Set the external-sharing limit – Anyone, New and existing guests, Existing guests, or Only people in your organization. Never set it more permissive than the parent tenant policy.
Sensitivity Labels: Custom Security for 100+ Teams Without Manual Work
Manually clicking through every team works fine when you have ten of them. It does not work when you have a thousand. This is where sensitivity labels in Microsoft Purview become the backbone of custom security in Teams, one published label can enforce policy across every new team, group, and SharePoint site automatically.
A sensitivity label applied to a Microsoft 365 group, and by extension, its Team and SharePoint site, can automatically enforce:
- Privacy (public or private)
- External user access (guests allowed or blocked)
- External sharing from the SharePoint site
- Unmanaged-device access (block, read-only, or full access)
- Default sharing link type
- Authentication context – meaning the user must satisfy a specific Conditional Access policy (for example, sign in with MFA or use a compliant device) before opening the team’s content
Set Up Group and Site Sensitivity Labels
Container labels enforce privacy, guest access, and sharing automatically at scale, so configuring them once saves manual cleanup across hundreds of teams.
Step 1: In the Microsoft Purview portal, go to Information Protection > Sensitivity Labels.
Step 2: Click + Create a label (or edit an existing one).
Step 3: Define the scope for this label, check Groups & sites – this is what makes the label a “container label,” meaning it applies to the team’s M365 group and SharePoint site rather than to individual files. Add Items too if you also want the same label to protect files and emails.
Step 4: Walk through the wizard and configure Privacy and external user access, plus External sharing and Conditional Access.
Step 5: Publish the label to the users and groups who should see it.
Step 6: Before users can apply container labels, enable them in your tenant once via
Connect-MgGraph -Scopes "Directory.ReadWrite.All"
 $grpUnified = Get-MgBetaDirectorySetting | Where-Object {$_.DisplayName -eq "Group.Unified"}
 $params = @{ Values = @( @{ Name = "EnableMIPLabels"; Value = "True" } ) }
 Update-MgBetaDirectorySetting -DirectorySettingId $grpUnified.Id -BodyParameter $params
 # Then sync labels from Security & Compliance PowerShell:
 Execute-AzureAdLabelSync
After publishing, every time a user creates a new team they pick a sensitivity label from a dropdown. The team, the group, and the SharePoint site inherit the matching protections automatically. No more manual cleanup.
Privacy in Shared Channels and Private Channels
Channels add a second layer of privacy inside a team, and as the admin who fields the “why can’t I see this channel?” tickets, you’ll want to know how each one behaves.
Channel type | Visibility | Membership | Storage |
|---|---|---|---|
Standard | Visible to all team members | Inherits team membership | Files in the team’s SharePoint site, under a channel folder |
Private | Visible only to invited team members | Subset of team members; owners managed separately | Dedicated, hidden SharePoint site per channel |
Shared | Visible to invited members from inside or outside the team (and even other tenants) | Can include people who aren’t members of the parent team | Dedicated SharePoint site that inherits the parent team’s sensitivity label |
The key shared-channel rule for admins: only people with owner or member permissions in the shared channel can access its content. Parent-team members – even you, as a tenant admin – don’t automatically get in. You have to be added to the channel itself.
For cross-tenant shared channels, you also need to configure Microsoft Entra cross-tenant access settings so identities from the partner tenant can authenticate cleanly. Skip that step and your end users hit endless “request access” loops, and your help desk hears about it.
Teams Premium: When the Standard Policy Isn’t Enough
If your organization handles board meetings, legal discovery, M&A (Mergers & Acquisitions), or government-related work, the standard Teams meeting policy alone isn’t enough.
That’s where Teams Premium comes in. It’s an add-on license designed for users who need a higher level of security. From an admin’s perspective, it provides additional security controls and enforcement options that aren’t available in the standard version of Microsoft Teams.
What you can enforce as an admin:
- Watermarks on shared video, audio, and screen content – every frame is stamped with the viewer’s email.
- End-to-end encryption for meetings with up to 200 participants.
- Limit who can record to just organizers and co-organizers.
- Controlled-content meeting templates that lock policy choices for the organizers under your governance.
- Block copy-paste from meeting chat – for clean-room discussions.
- Apply a sensitivity label to the meeting itself – so the label’s policies (chat retention, recording, encryption) move with it.
Three Methods to Configure Custom Security in Teams (Compared)
There’s no single right way to apply custom security – most organizations use a mix. Here’s how the three main approaches stack up.
Method | Best for | Pros | Cons |
|---|---|---|---|
Manual configuration (Teams + SharePoint admin centers) | Small tenants (<50 teams), one-off exceptions | Total control; no licensing dependencies | Time-consuming; easy to drift; owners can re-flip privacy |
Sensitivity labels (Microsoft Purview) | Mid-size to enterprise; regulated industries | Scalable; enforced at creation; covers Teams + groups + sites in one shot | Needs Microsoft 365 E3/E5 or Entra ID P1; one-time PowerShell setup |
Owner-driven governance (with chatbot or self-service app) | Organizations where IT can’t sustain manual labeling | Distributes responsibility; faster onboarding | Quality depends on owner training; needs a governance tool or custom bot |
Microsoft Teams Privacy & Security: Quarterly Review Checklist
Run this every 90 days. Block 2 hours on your calendar – it’s faster than recovering from an incident.
Tenant-level
- Confirm default privacy stance is Private
- Audit Guest access master toggle and granular permissions
- Audit External access domain allow/block list against your approved-partner list
- Verify Anonymous meeting join and lobby bypass policies match your baseline
- Confirm SharePoint org-level sharing is no more permissive than your Teams policy
- Confirm Microsoft Purview sensitivity labels for groups and sites are enabled
- Confirm 3–4 labels are published and applied (Public, General, Confidential, Highly Confidential)
Team-level
- Every team has an assigned sensitivity label
- No Public teams contain confidential data (run a label-coverage report)
- Inactive teams are archived or deleted via access reviews
- Each team has at least two active owners (no ownerless teams)
- Shared channels list reviewed for stale external members
Meeting-level
- Default lobby = People in my org
- Anonymous start = Off
- Bot detection = Onfor anonymous/external joins (replaces the retired CAPTCHA check)
- Sensitive meetings use Teams Premium templates with watermarks and restricted recording
Keep going
Pair this guide with the rest of the Apps4.Pro security playbook:
- Microsoft Teams Admin Center Guide for IT Admins – the full tour of every policy area
- Microsoft Teams Private Channel Governance & Security Checklist – deep-dive on private-channel lifecycle controls
Planning a Microsoft Teams migration? Talk to the Apps4.Pro team We help Microsoft 365 admins consolidate, secure, and migrate Teams at enterprise scale.